Servings: 10 Servings
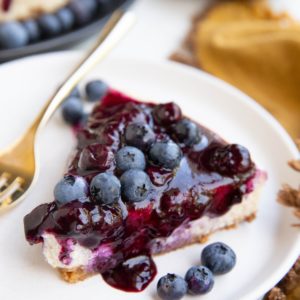
Blueberry Cottage Cheese Cheesecake
A healthier cheesecake recipe with lower fat, lower sugar, more protein and a delicious blueberry topping to boot!
Equipment
Ingredients
Graham Cracker Pie Crust:
- 1 ½ cups (180g) gluten-free graham cracker crumbs about 11-12 full graham crackers
- 2 Tbsp (30 ml) unsalted butter, melted
- 3 Tbsp (44ml) pure maple syrup
- Pinch sea salt
- ¼ tsp ground cinnamon optional
Cheesecake Filling:
- 24 ounces cottage cheese*
- ½ cup (118 ml) pure maple syrup
- 2 large eggs**
- 2 tsp pure vanilla extract
- 1 Tbsp (9g) tapioca flour or gluten-free all-purpose flour or cornstarch
- ½ tsp sea salt
Blueberry Topping:
- 3 cups fresh blueberries
- 2 Tbsp (30ml) fresh lemon juice
- 3 Tbsp (44ml) pure maple syrup
- 2 tsp tapioca flour gluten-free all-purpose flour, or cornstarch
Instructions
Prepare the Crust:
- Preheat the oven to 350 degrees F and line the bottom of a 9-inch springform pie pan with a circle of parchment paper.
- Place the graham crackers in a food processor or blender and blend until a coarse flour forms.If you don’t have a food processor, you can also transfer the graham crackers to a large zip lock bag. Seal the bag and use a rolling pin to break up the graham crackers.
- Transfer the melted butter, pure maple syrup, salt, and cinnamon to a large mixing bowl along with the graham cracker mixture. Mix until everything is well combined. The mixture will be crumbly - this is normal.
- Pour the graham cracker crust mixture into the bottom of the prepared pie pan and press it into an even layer with your hands.
- Bake the crust on the center rack of the preheated oven for 10 minutes, or until the edges are slightly golden brown.
- Remove the pie crust from the oven and allow it to cool while you’re preparing the cheesecake filling.
Make the Cheesecake Filling:
- Transfer the cottage cheese and pure maple syrup to a high powered blender and blend on medium speed until completely smooth.
- Add the eggs, vanilla extract, tapioca flour, and sea salt to the blender and blend on low speed just until all of the ingredients are combined. Avoid over-blending the mixture.
Bake the Cheesecake:
- Wrap the bottom and sides of the pie dish with aluminum foil and place it inside of a large roasting pan (Note: you will need a roasting pan that is large enough to accommodate the pie pan with some room around the edges). Spray the inside sides of the pan with nonstick cooking spray.
- Heat a kettle of water to a full boil. Pour the hot water around the outside of the pie pan, creating a water bath. The water needs to go about half-way up the outside of the pie pan.
- Pour the cottage cheese cheesecake filling mixture into the pie dish and spread it into an even layer. Cover the top of the pie dish with aluminum foil. While all of these steps may seem like overkill, the water bath and the foil will allow the cheesecake to bake evenly without getting too brown anywhere. If you’d like to skip the waterbath altogether, you certainly can but the texture of the cheesecake won’t turn out as tender.
- Move the roasting pan to the center rack of the preheated oven and bake for 50-60 minutes, or until the sides of the cheesecake have firmed up but the center is still slightly jiggly. A great way of determining the doneness of cheesecake is by inserting a digital thermometer into the center. Cheesecake is best when it reaches an internal temperature of 150 degrees Fahrenheit.
Refrigerate the Cheesecake:
- Remove the cheesecake from the oven and allow it to cool until the outside of the pan is cool enough to handle, about 20 minutes. Kee the pie pan covered with foil and transfer it to the refrigerator. Chill for at least 4 hours or until the cheesecake has completely cooled and set up.
- Cheesecake tastes even better the next day following preparation or the 3 to 4 days following. For this reason, I recommend making the cheesecake ahead of time. Also be sure to give yourself plenty of time because it needs to cool completely before serving.
- Cheesecake keeps for up to 1 week in the refrigerator.
Make the Blueberry Cheesecake Topping (Optional):
- Add the blueberries, lemon juice, and pure maple syrup to a small saucepan. Cover the pot and heat over medium heat on the stove top to bring the blueberry mixture to a full boil. Cook, stirring occasionally, until the blueberries release a great deal of liquid. Stir in the gluten-free all-purpose flour (or tapioca flour or cornstarch) and continue cooking until the sauce around the blueberries has thickened.
- Pour the blueberry topping into a bowl and refrigerate until chilled. When you’re ready to serve, release the cheesecake from the springform pan (remove the outer mold).
- Transfer blueberry topping to the chilled cheesecake and spread into an even layer. Slice and serve! Alternatively, you can slice the cheesecake first and then drizzle each individual piece with blueberry topping before serving.
Notes
*I recommend using higher fat cottage cheese (I use 4% fat) for the best result rather than using low-fat cottage cheese. This makes the cheesecake taste richer with a tender texture.
**For an egg-free version, replace the eggs with ¼ cup of tapioca flour, gluten-free all-purpose flour, or cornstarch. The cheesecake won’t rise as much but it will still hold together nicely.
If you’d like, you can make a traditional graham cracker crust with 1.5 cups graham cracker crumbs, ¼ cup white sugar, and 6 tablespoons of melted butter.
Nutrition
Serving: 1Slice (of 10), Calories: 258kcal, Carbohydrates: 42g, Protein: 10g, Fat: 7g, Saturated Fat: 3g, Monounsaturated Fat: 1g, Cholesterol: 55mg, Sodium: 497mg, Fiber: 2g, Sugar: 30g