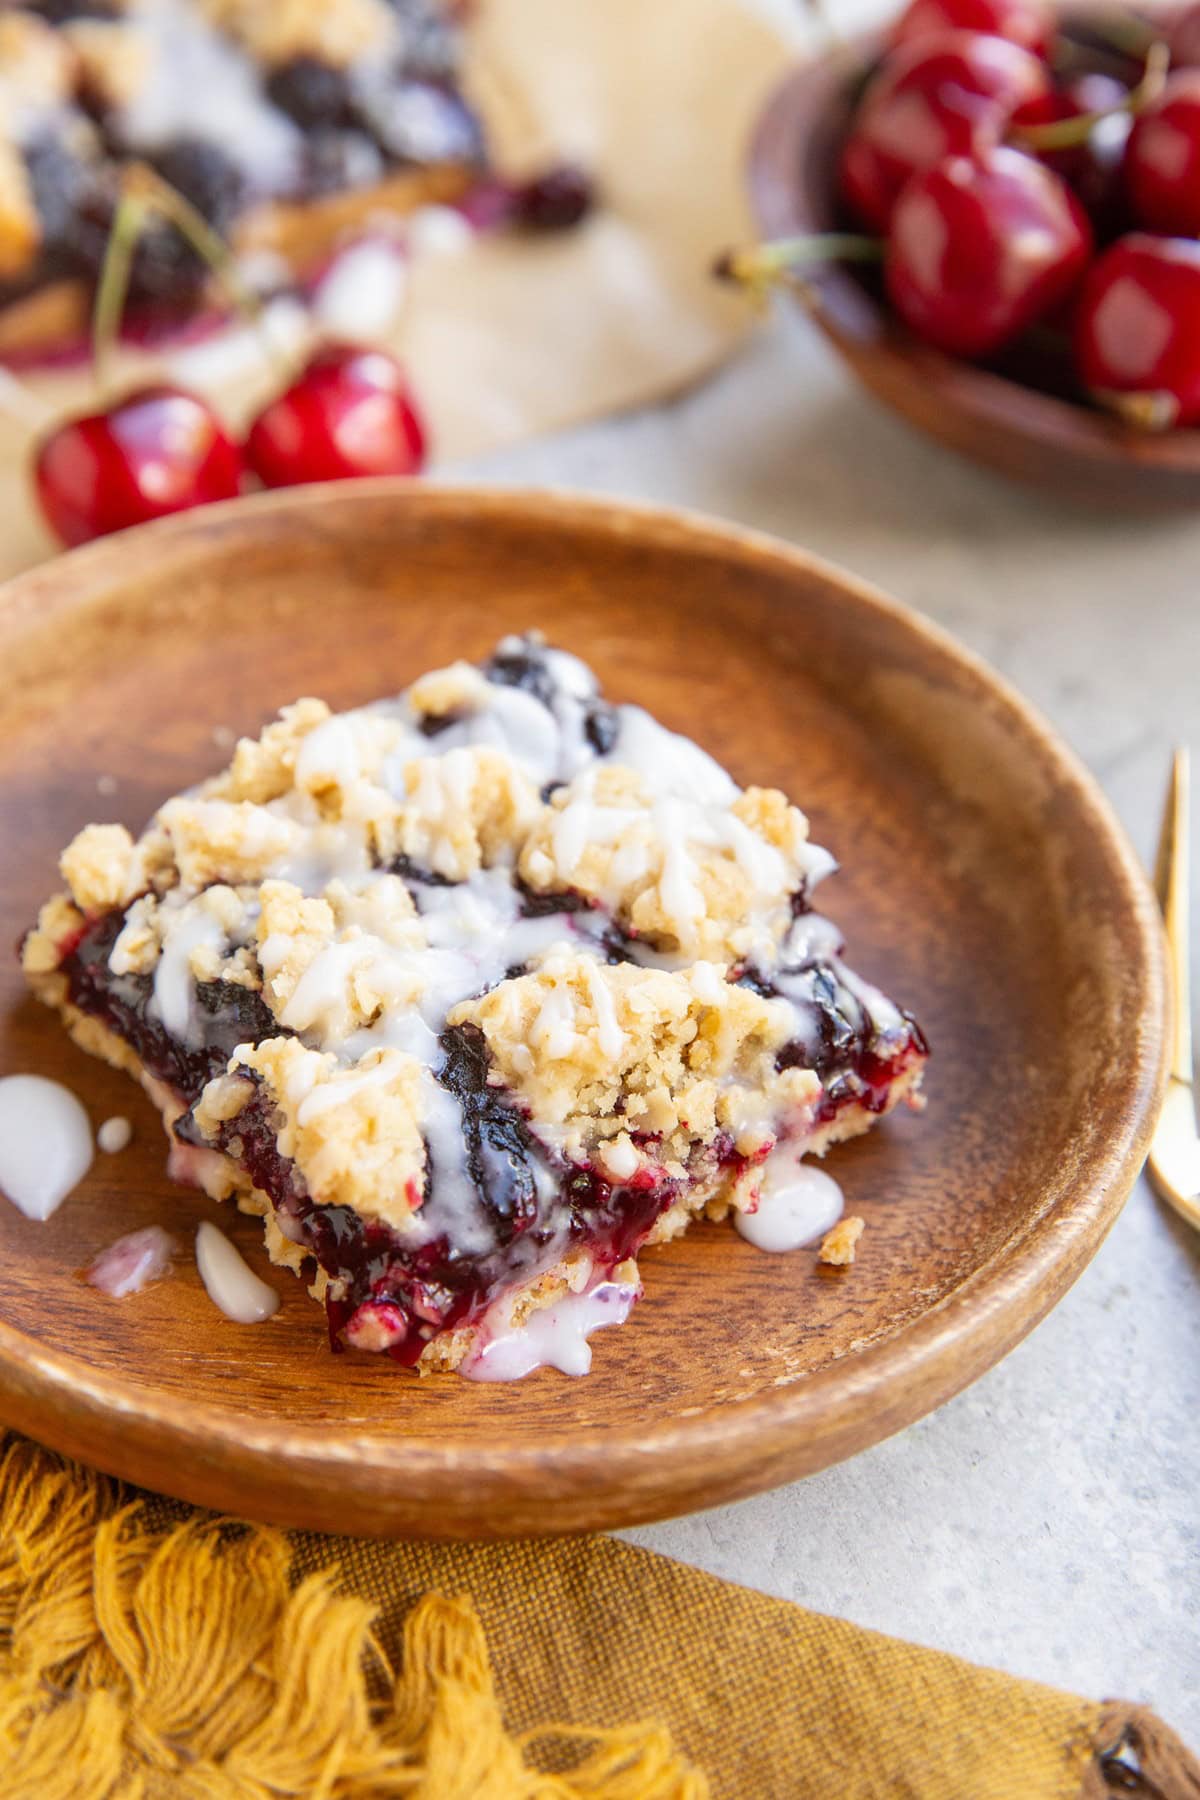
These sweet Cherry Pie Bars feature a shortbread crust, crumble topping, and a fresh homemade cherry pie filling. Plus, they are made with only 7 basic ingredients!
If you’ve been around The Roasted Root for quite some time, you know I have a major affinity for fruit crumb bars.
It all started with my Paleo Blueberry Crumb Bars back in 2019, then transferred over to Paleo Apple Pie Bars and has since evolved into Strawberry Oatmeal Bars, Vegan Blackberry Pie Bars and much, much more!
A buttery shortbread crust is the caravan for delicious homemade cherry pie filling, then topped with a lovely crumble topping and glaze. This delicious dessert is easier to make than traditional pie and arguably tastes more impressive!
The end result is a rich and fruity treat that is guaranteed to impress your friends and family. I recently brought these cherry bars to a dinner at a friend’s house and they disappeared within the evening!
What’s not to love about a refreshing treat??
I make all of my crumb bar recipes gluten-free and dairy-free, but you can easily make them using regular flour and butter if you’d prefer. There’s plenty of versatility to work with here!
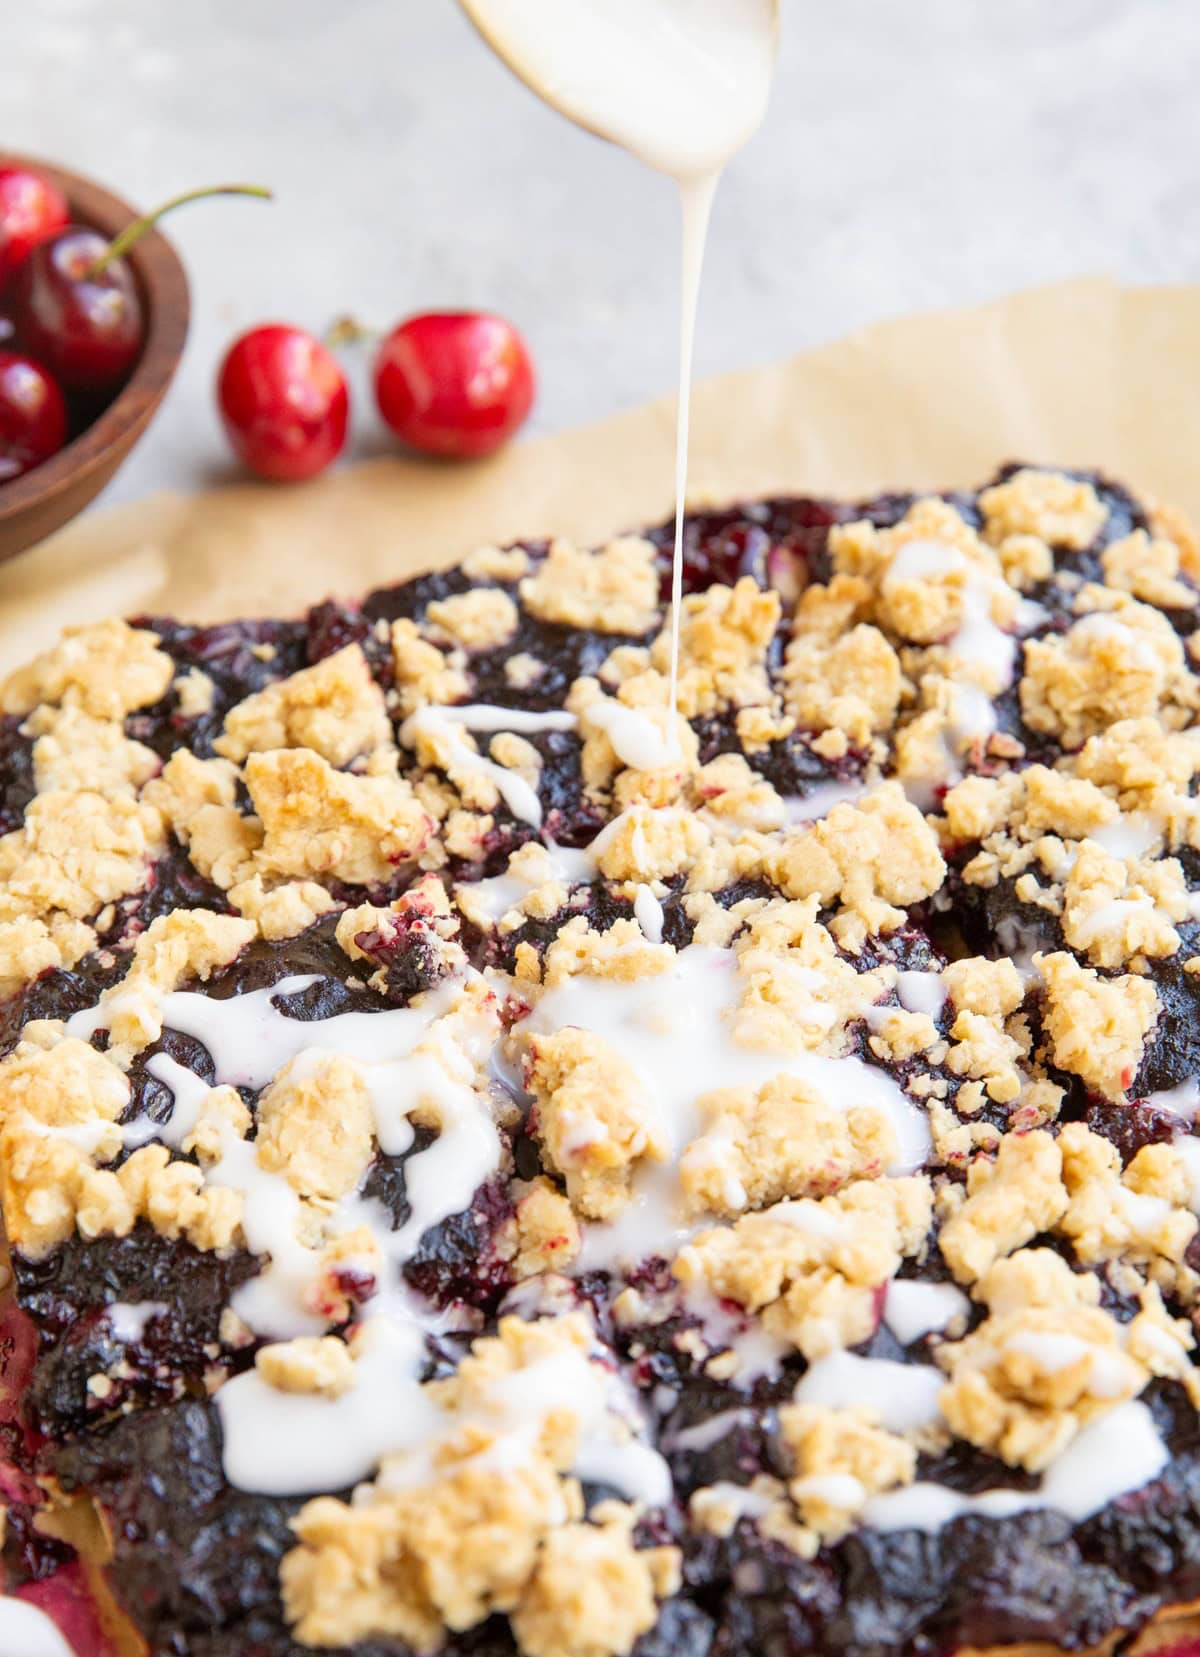
While the glaze is entirely optional, adding it gives the bars a sort of cherry Danish vibe, which I really appreciate. It is truly a mouth-watering experience!
If you follow a low-carb diet, don’t feel left behind! You can make my 5-Ingredient Low-Carb Cherry Pie Bars.
Let’s discuss the simple ingredients for cherry pie crumb bars. They can be found at any major grocery store.
Ingredients for Cherry Pie Bars:
Fresh or Frozen Cherries: Use fresh cherries or frozen cherries for the backbone of the cherry pie filling! I like using frozen cherries because the pitting is already done for me.
If you have a plethora of fresh cherries on hand and want to use them up, break out your cherry pitter and go to town!
Fresh Lemon Juice: Added to the pie filling to bring a subtle fresh citrus nuance and oddly enough brings out the cherry flavor, we need a couple tablespoons of lemon juice.
You can get this from about ½ a lemon. If you’d like, add lemon zest to the filling or shortbread crust mixture.
Pure Maple Syrup: Used to sweeten both the cherry pie filling and the crust and topping, we need some pure maple syrup.
Gluten-Free All-Purpose Flour: We use gluten-free flour as the base for the crust and crumb topping and also to thicken the cherry pie filling. Pick a brand you’ve used many times in the past and enjoy.
I always use Bob’s Red Mill Gluten-Free 1-to-1 Baking Flour because I find it truly is the perfect 1:1 replacement for regular all-purpose flour and results in the best texture.
Melted Coconut Oil or Butter: Used to bring the crust ingredients together in rich harmony, we need some form of fat.
If you aren’t dairy-free, use buttery for that delicious creamy flavor. Otherwise, use coconut oil and you’ll end up with a vegan dessert.
Quick Oats: Oats get mixed into the crust and topping mixture for a slight streusel effect. They provide such a lovely oatty flavor!
If you need the bars to be gluten-free, be sure to use certified gluten-free oats. I use gluten-free sprouted oats.
Pure Vanilla Extract: While this ingredient is optional, I like adding a splash of vanilla to the crust mixture in order to add some warm flavor. I also add a little almond extract, which is again: optional.
Ingredients for Powder Sugar Glaze:
Powdered sugar and water is all you need for a simple glaze! If you prefer sweeter treats, I recommend making the glaze. If you prefer less sweet treats, skip it!
Now that we’ve covered the basic ingredients list, let’s make these delightful cherry crumb bars!
How to Make Cherry Pie Bars:
Make the Crust and Crumble Topping:
Preheat the oven to 350 degrees Fahrenheit and line a 8” x 8” baking pan with parchment paper.
Add all of the ingredients for the shortbread crust and topping to a large mixing bowl and mix well until everything is combined.
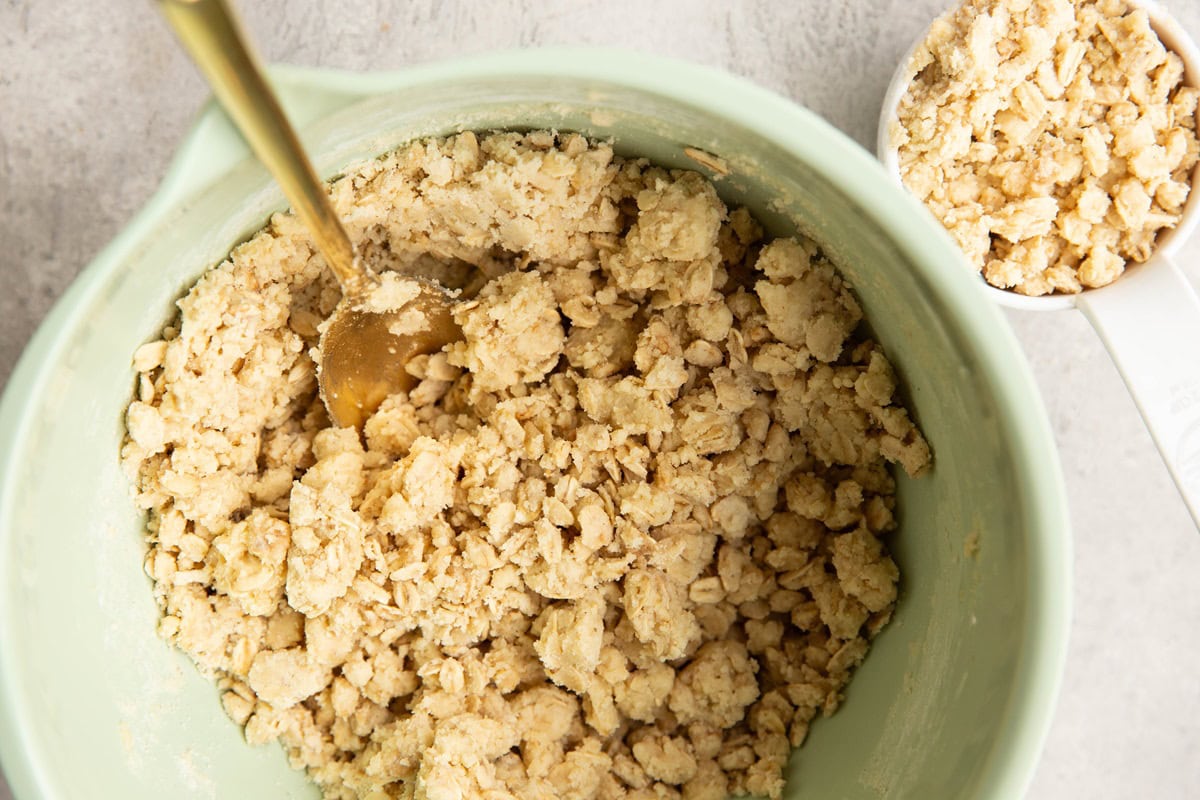
Measure out ½ cup of the mixture and set it aside to use as topping later.
Note: there is no need to separate the dry ingredients from the wet ingredients, as everything can be mixed at the same time.
Transfer the rest of the crust mixture to the prepared baking dish and press it into an even layer. I use my hands for this. Poke the crust several times with a fork to ensure it bakes evenly.
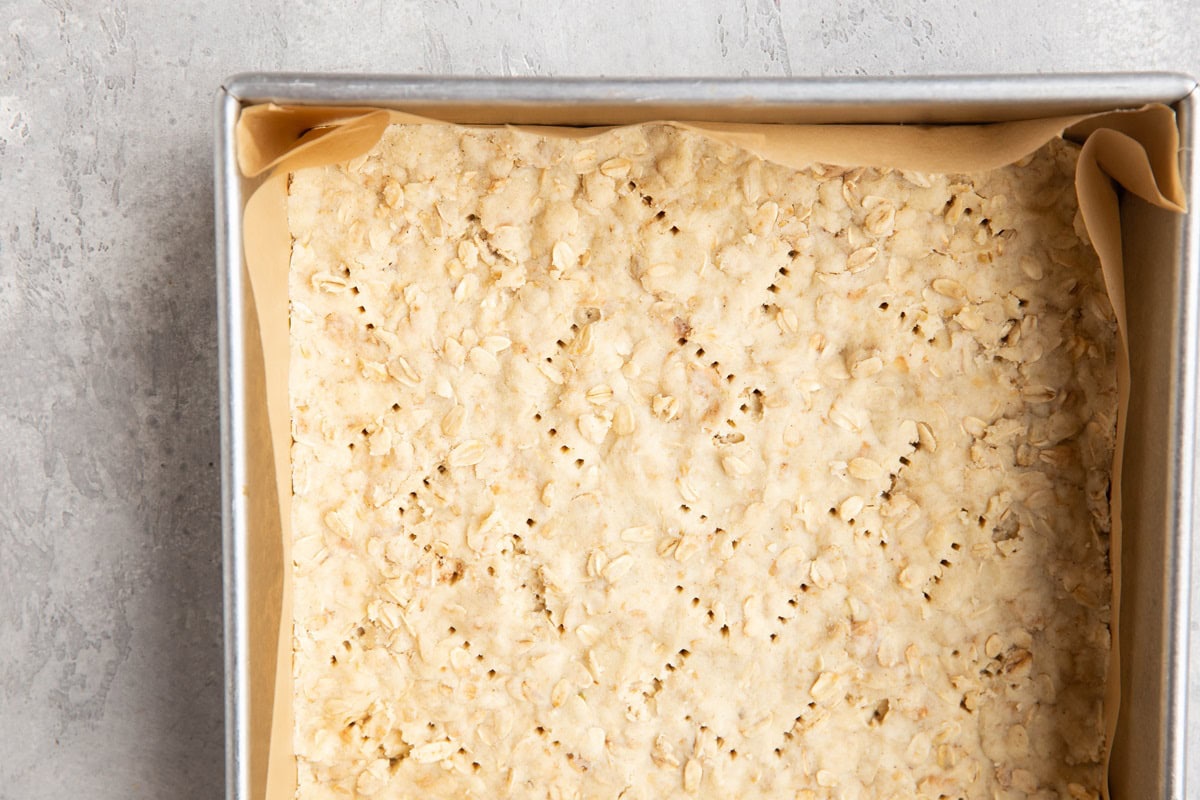
Bake on the center rack of the preheated oven for 15 minutes, or until the edges are just slightly golden brown.
While the crust is baking, prepare the cherry pie filling.
Prepare the Cherry Pie Filling:
Add the pitted cherries, fresh lemon juice, and pure maple syrup to a medium saucepan and heat over medium-high heat on the stove top.
Allow the mixture to come to a full boil, stirring occasionally. Once boiling, use a fork or a potato masher to mash the cherries to your desired consistency. I leave them fairy chunky.
Stir in the flour and a pinch of sea salt and continue stirring until any lumps of flour have dissolved and the filling is nice and thick.

Prepare the Cherry Pie Bars:
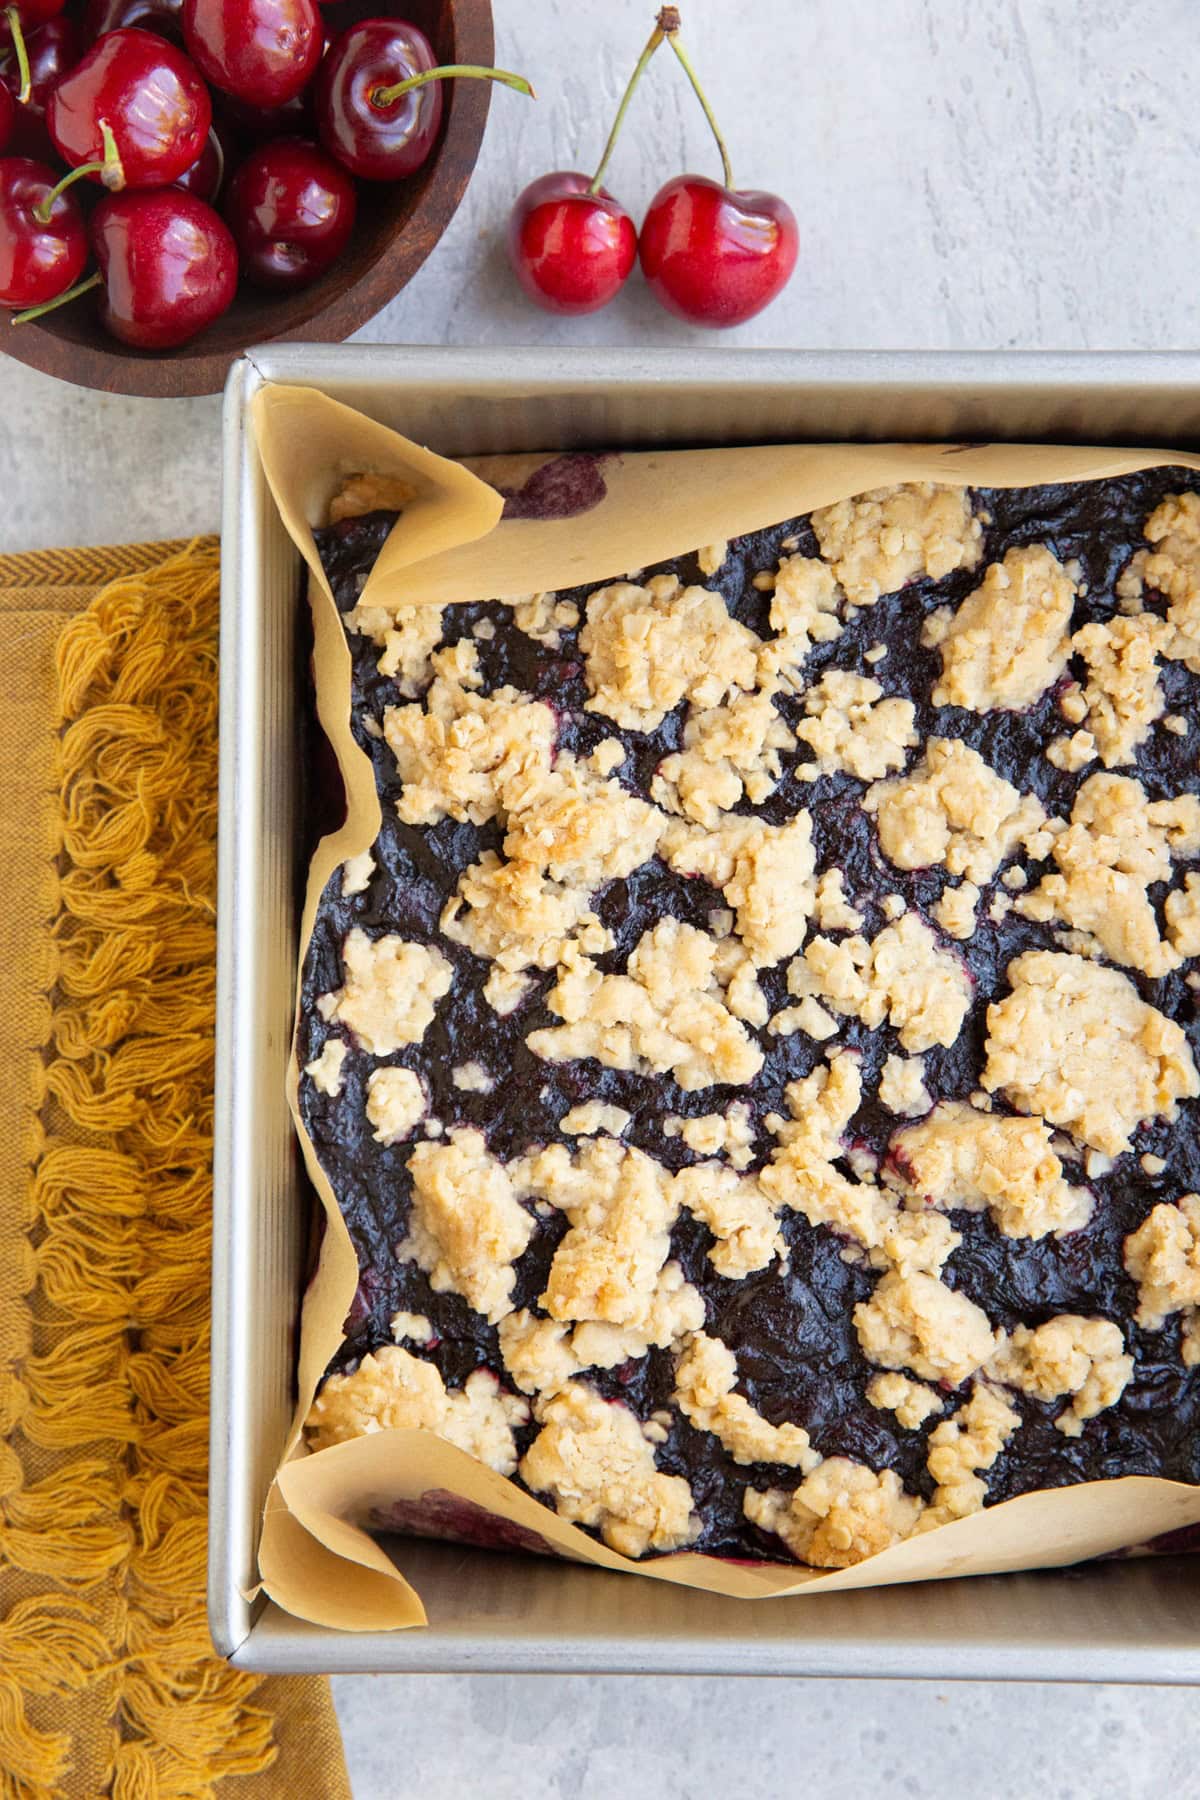
Pour the cherry filling over the prepared crust and spread it into an even layer. Sprinkle the reserved topping over the top of the filling.
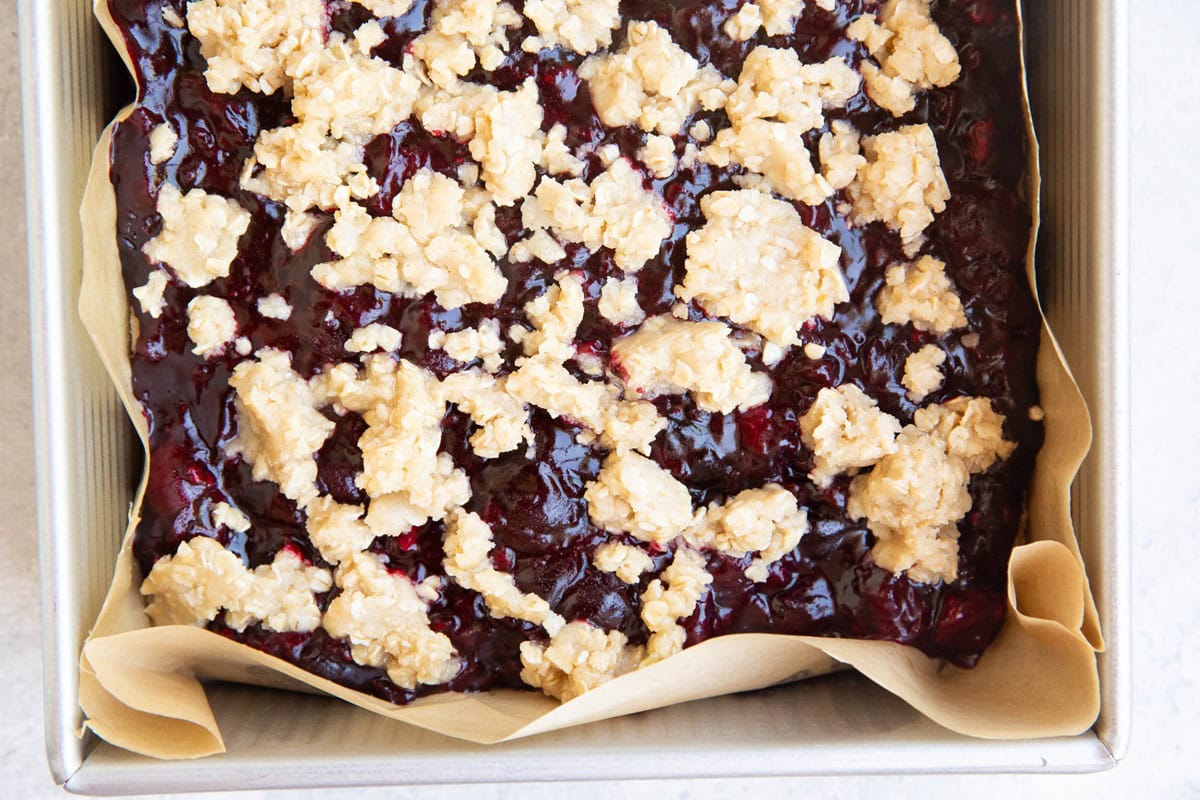
Bake (still at 350) for 22 to 30 minutes or until the topping is slightly golden brown and the filling is bubbly.
Remove the bars from the oven and allow them to cool completely to room temperature. To speed up the process, you can allow the bars to cool for 20 minutes on a wire rack and then transfer them to the refrigerator to cool the rest of the way.
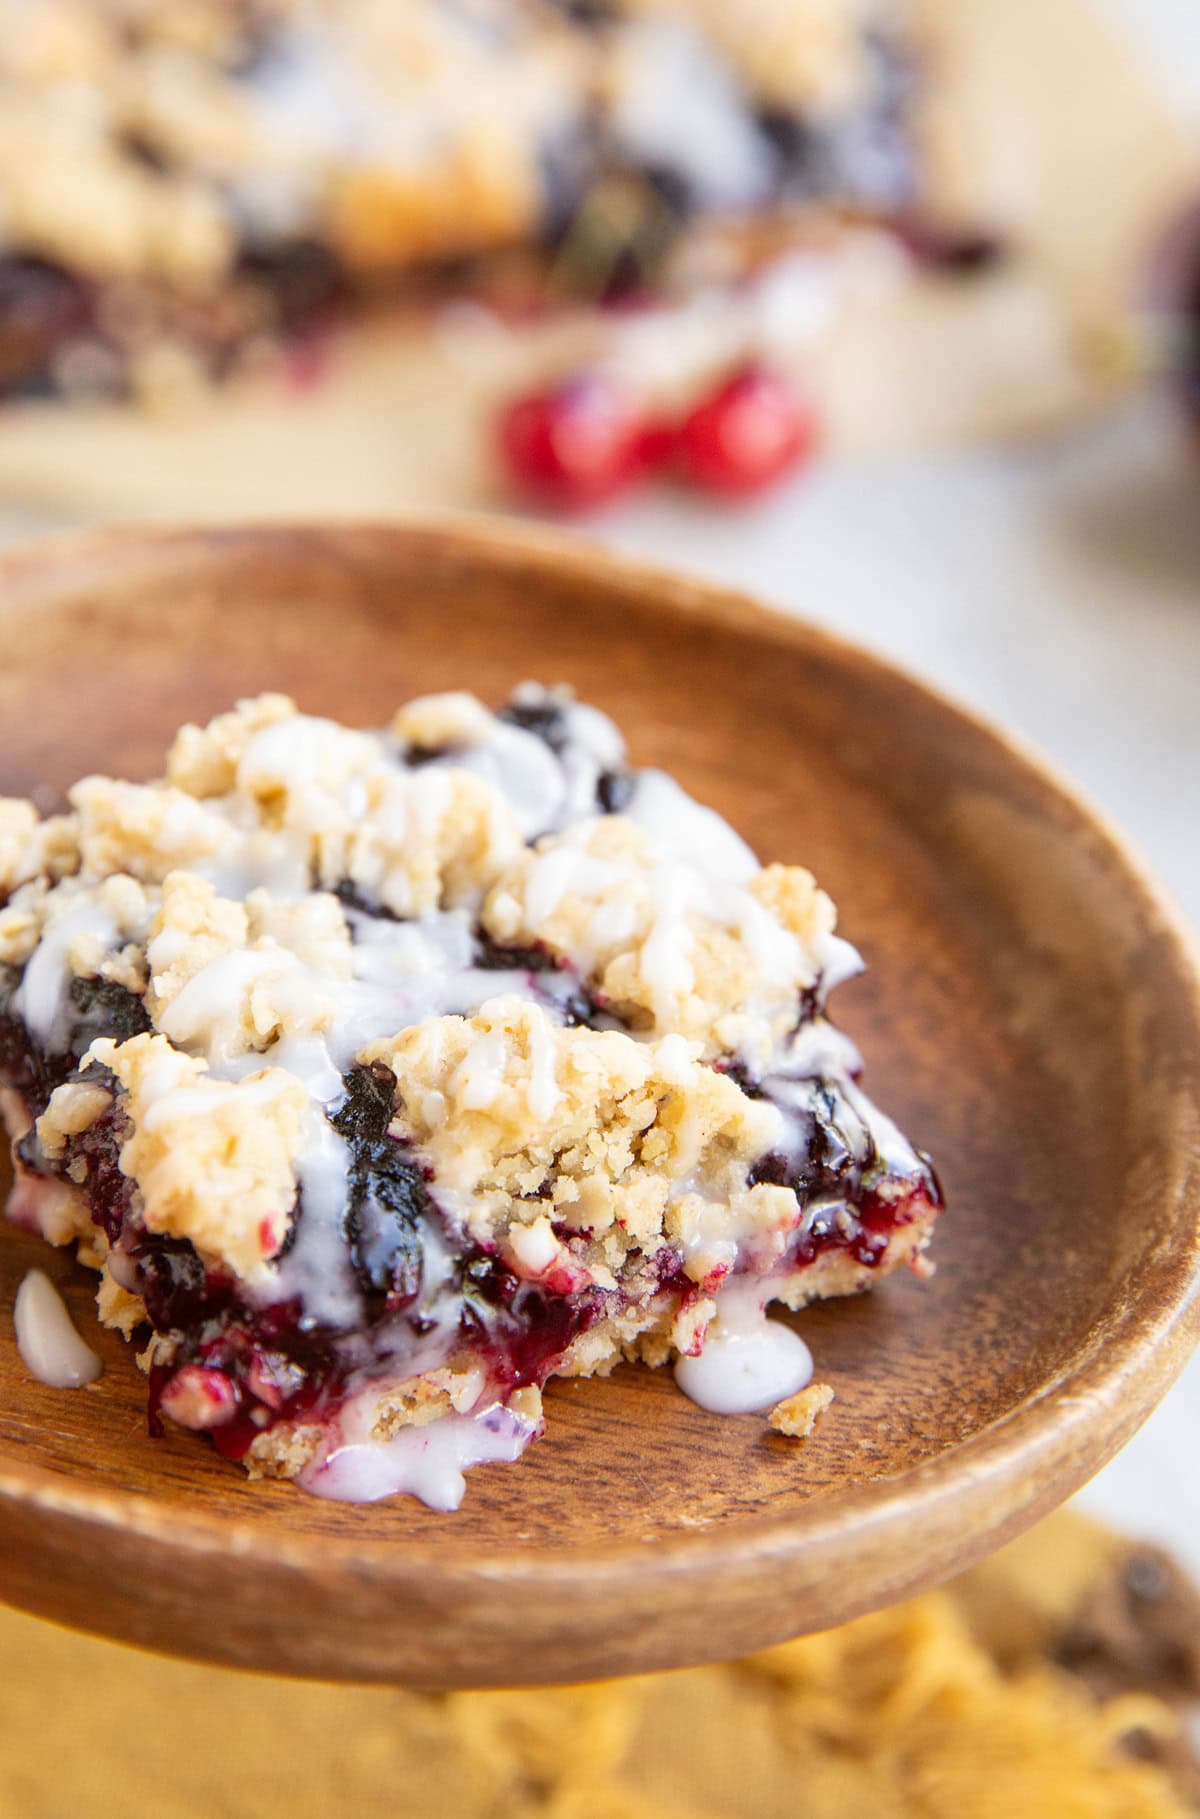
At this point, the bars are ready for consumption so you can either slice them into individual slices and serve them as is, or you can make the amazing glaze (I recommend making the glaze).
Make The Powder Sugar Glaze:
To make the optional powdered sugar glaze, stir 1 cup of powdered sugar and two tablespoons of water or lemon juice together in a small bowl or measuring cup until the sugar has completely dissolved.
Drizzle your desired amount of glaze over the bars.
How to Slice Cherry Pie Bars:
I’ve found the easiest way to cut individual slices is to do the following. Lift the sides of the parchment paper in order to transfer the whole batch to a cutting board. Use a sharp knife to cut straight lines, creating 9 to 12 bars.
Because this cherry pie bars recipe is naturally crumbly due to its flaky crust, it is easiest to serve the bars after they have been fully cooled and after pulling them out of the pan.
For an even more decadent dessert, serve the scrumptious cherry pie bars with a scoop of vanilla ice cream.
How to Store Crumb Bars:
Store crumb bars in a zip lock bag or airtight container at room temperature for up to 2 days or in the refrigerator for up to 5 days. Freeze for up to 3 months.
These easy cherry pie bars taste even better the next day and the 3-4 days following preparation. For this reason, feel free to make them in advance.
The next time you need a crowd-pleasing dessert recipe that everyone will love, whip up these easy peasy cherry pie bars!
If you’re all about cherries this time of year, also try out these delicious cherry recipes!
Explore More Cherry Recipes:
- Gluten-Free Cherry Cobbler
- Cherry Berry Cashew Ginger Smoothie
- Roasted Peach Cherry and Walnut Yogurt Parfaits
- Boozy Roasted Cherry Dark Chocolate Chunk Ice Cream
- Homemade Cherry BBQ Sauce
Enjoy these sweet cherry pie bars for breakfast! They include fruit, so it’s basically a smoothie 😉
Cherry Pie Bars
Equipment
Ingredients
Cherry Pie Filling:
- 16 ounces pitted cherries fresh or frozen
- 2 Tbsp fresh lemon juice
- 2 Tbsp pure maple syrup
- 2 Tbsp gluten-free all-purpose flour
- 1 Pinch sea salt
Shortbread Crust and Topping:
- 12 Tbsp unsalted butter or coconut oil melted
- 1 1/3 cups gluten-free all-purpose flour or regular all-purpose flour
- 1 cup gluten-free quick oats
- ¼ cup pure maple syrup
- 1 tsp pure vanilla extract optional*
- 1/2 tsp sea salt
Optional Glaze:
- 1 cup powdered sugar
- 2 Tbsp water or lemon juice
Instructions
Make the Crust and Crumble Topping:
- Preheat the oven to 350 degrees Fahrenheit and line a 8” x 8” baking pan with parchment paper.
- Add all of the ingredients for the shortbread crust and topping to a large mixing bowl and mix well until everything is combined. Measure out ½ cup of the mixture and set it aside to use as topping later. Note: there is no need to separate the dry ingredients from the wet ingredients, as everything can be mixed at the same time.
- Transfer the rest of the crust mixture to the prepared baking dish and press it into an even layer. I use my hands for this. Poke the crust several times with a fork to ensure it bakes evenly.
- Bake on the center rack of the preheated oven for 15 minutes, or until the edges are just slightly golden brown.
- While the crust is baking, prepare the cherry pie filling.
Prepare the Cherry Pie Filling:
- Add the pitted cherries, fresh lemon juice, and pure maple syrup to a medium saucepan and heat over medium-high heat on the stove top. Allow the mixture to come to a full boil, stirring occasionally. Once boiling, use a fork or a potato masher to mash the cherries to your desired consistency. I leave them fairy chunky.
- Stir in the flour and a pinch of sea salt and continue stirring until any lumps of flour have dissolved and the filling is nice and thick.
Prepare the Cherry Pie Bars:
- Pour the cherry filling over the prepared crust and spread it into an even layer. Sprinkle the reserved topping over the top of the filling.
- Bake (still at 350) for 22 to 30 minutes or until the topping is slightly golden brown and the filling is bubbly.
- Remove the bars from the oven and allow them to cool completely to room temperature. To speed up the process, you can allow the bars to cool for 20 minutes on a wire rack and then transfer them to the refrigerator to cool the rest of the way.
- At this point, the bars are ready for consumption so you can either slice them into individual slices and serve them as is, or you can make the amazing glaze (I recommend making the glaze).
Powder Sugar Glaze:
- To make the optional powdered sugar glaze, stir 1 cup of powdered sugar and two tablespoons of water or lemon juice together in a small bowl or measuring cup until the sugar has completely dissolved. Drizzle your desired amount of glaze over the bars.
Notes
How to Slice Cherry Pie Bars:
After the bars have cooled completely, lift the sides of the parchment paper and pull the whole batch of bars out of the pan to transfer to a cutting board. Use a sharp knife to cut 9 to 12 bars.Nutrition
This post contains affiliate links, which means I make a small commission off items you purchase at no additional cost to you.


I like to try recipes from Julia. We have similar interests in food and she makes her recipes adaptable to different diets. This one I decided to try because my husband loves cherries. I used fresh cherries instead of frozen. As Julia said in the recipe, pitting the cherries took too much time and I would use frozen ones next time. That being said, I like to share my “treats” and I got very good feedback on these. I suggest cooking them for the 30 minutes as mine were still a little soft doing 25 minutes. These tasted yummy by themselves but also would have been perfect with a little whip cream or ice cream on top!
Thanks so much for sharing your experience and for the sweet words, Mary! This is super helpful to others who want to try the recipe 🙂 Happy baking!
Sooo delicious! Like a pie but so much easier! I used Bob’s red mill 1:1. Added a dash of both vanilla and almond extract. So good; thank you!